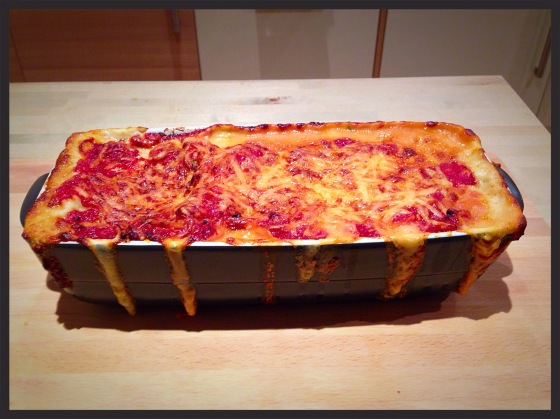
The Most Amazing Lasagne!

IMG_2281

Hello everyone 🙂

I just had my first day at work today, it was lovely to meet new people and im excited for the week ahead! BUT the walk home was in the dark and miserable rain… I even got splashed by a passing lorry! Although it was comforting getting indoors, I was really just in the mood for an easy hearty supper!

I had recently bought myself some ricotta to try some aubergine roll ups, but my boyfriend had mentioned that we needed to use up our spinach and courgette, so I took to google to get some inspiration. Heres what I found,

A spinach and ricotta lasagne:

http://www.waitrose.com/content/waitrose/en/home/recipes/recipe_directory/c/courgette-spinachricottalasagne.html

Ok so mine has quite a few little tweeks but I LOVED it and just had to share it with you! This recipe will now be a regular in my house! Which means a lot as we mostly have a different meal everyday!

I made a Spinach, Courgette and Ricotta Lasagne:

Recipe:
Lasagne sheets
160g spinach
1 courgette grated
Some grated cheddar cheese
250g Ricotta
1 tin of chopped tomatoes
Oregano
Milk
Butter
White plain Flour
Nutmeg

Instructions
Preheat the oven to 180c

For the White sauce:
I added around a tablespoon of butter and allowed to melt on a low heat. I then added around 2 tablespoons of white plain flour and whisked together.

Then add small amounts of milk and continuously whisk until my chosen thickness of sauce. I then added some grated cheese for flavour and a pinch of nutmeg. Remember that the added cheese will add some extra thickness to the sauce. Leave on a low heat and occasionally whisk so a film doesnt form on the top.

IMG_2279

Tomato sauce:
Bring a tin of tomatoes to the boil and then reduce to simmer with a few shakes of oregano. Allow to simmer while you now focus on the spinach mix.

Spinach Filling:
I added the bag of spinach to a pan with a teaspoon of butter and allowed it to wilt. You could use a dash of water instead if you wanted to save on some calories! I then shaved in a courgette!

Once the spinach had wilted I added all of the ricotta and a few shakes of oregano and a pinch of salt and pepper.

IMG_2278

Layers that I used:
Tomato Sauce Layer
1 layer of Lasagne sheets
Spinach layer
1 layer of Lasagne sheets
White sauce
Spinach Layer
Then repeat as above

*BUT I saved the tomato layer to only the bottom and the top layer which I then sprinkled with cheese! *

Place the finished lasagne in the oven and cook for 30-45 minutes. Mine was quite small so that time was fine, if you need longer but the cheese is already golden brown simply add some tinfoil to cover it and continue to bake!

IMG_2280

IMG_2282

Then simply serve! Oh so good… So tasty… Now to just open a bottle of prosecco and sit back 🙂 thats my kind of Friday night!

Whats your favourite new recipe or have you ever tried something similar to this?

Much love and enjoy your valentines weekend! Xo

Israeli Couscous with Butternut Squash

Hello lovelies 🙂

Im in that transition period between jobs, I don’t start until next Monday, so Ive found myself with extra time where all I can think about is food! But the hard part is figuring out what to have…. What do I have in the kitchen… What can I make without having to buy anything else….So heres what Ive made today for a yummy healthy lunch. Its packed full of flavour and its so quick and easy!

Israeli/ Pearl Couscous is one of my favourite dishes and it goes great as a side dish or as a main! You can make it in bulk for through the week or is even a great party treat.

Heres my interpreatation recipe for Israeli Couscous and Butternut Squash

IMG_2267

  • Small Butternut Squash
  • Pearl couscous (I made enough for 2 according to packets instructions)
  • 1/2 Red Pepper
  • 1/2 Orange Pepper
  • A Few Sprigs of Fresh Flat-leaf Parsley
  • A dash of Cinnamon
  • A Dash of Cumin
  • The Juice of 1 Lemon
  • A Handful of Pine nuts
  • A Handful of Rocket
  • A Few Sprigs of Fresh Thyme

Directions

1. Pre-heat your oven to 180C/350F/Gas 4

2. I quartered my butternut squash, leaving the skin and seeds removed, I placed it on some foil and added a small drizzle or olive oil and some fresh thyme. Allow to cook until tender. Mine took 20 Minutes but can range depending on size. (I got these directions from bbc.co.uk/food/recipes/roastedbutternutsquash, but I left off the salt).

IMG_2268

3. Meanwhile, I cooked my couscous in some boiling water according to my packets instructions.

4. As the couscous cooked I prepared my peppers into cm squares and finely chopped up the parsley.

5. Once ready I drained off the excess water and added in my cinnamon, parsley, lemon juice, peppers and rocket.

6. I then gently toasted the pine nuts and mixed them through.

7. Finally, you can either remove the skin and chop up the butternut squash to mix through. Or as it was just for my partner and I, we just served the butternut squash as it was and added the couscous on the side.

Delish! Definitely a welcomed healthy warming lunch! To make it more hearty you could always add in some chickpeas, or a popular addition is raisins/ cranberries or pomegranate!

If you’re making it vegan, be sure to check your couscous ingredients just incase yours contains milk powder etc.

Hope you get some inspiration for your lunch! Much love Xo

Last Minute Valentines Day Gift Inspiration

Valentines-Day-Roses

Hello Lovelies!

Its that time of year again, christmas has been and gone, you spent weeks figuring out what the perfect gifts would be and you’ve seen your loved ones be spoiled for choice. Now valentines day comes around.. and you’re thinking… What on earth is left to get them, or I wish I would’ve saved that gift for valentines! Well look no further, Ive managed to come up with a few things that I love which I am sure will help you out. I hope my boyfriend doesn’t read this as this gift guide will be based on what I am getting for him, and the gifts I wouldn’t mind for myself 😉

My idea is based around ‘The Sensual Gift’ of embracing our 5 senses 😉 Of course all of these gifts would be perfect individually or you can buy and combine smaller presents but with meaning behind them!

This is a concept which could be for both Him/ Her

Touch

For a bit of a naughty idea you could go for massage oil or you can even buy small little body massagers. If you’re looking to splurge you could even go for a massage for 2 at your local parlour. This could also be a great idea if your partner plays a lot of sports… get them a sports massage.

You could even buy a ‘feather tickler’ and some handcuffs for the naughty devil inside you!

For the more innocent gift of ‘touch’ you could go for a cuddly hot water bottle, or for someone who likes the outdoors you could buy them some hand warmers for their pockets.

305-6307_PI_TPS1981348

These are just £3 from Tesco, just pop in your pockets and go! http://www.tesco.com/direct/hot-hands-hand-warmers-5-pairs/305-6307.prd

321298329

This one is now only £3 from newlook! http://www.newlook.com/shop/womens/accessories/brown-wheat-owl-_321298329

Taste

Does your partner have a favourite chocolate, or are they in to tea/coffee? This is the perfect idea to incorporate into your ‘taste  gift’

A bit of a chef? why not cook them their favourite meal, some cookies or a cake?

cq5dam.web.266.200

Heart-shaped Chocolate Raspberry Cakes

Recipe found from: http://www.cookingchanneltv.com/recipes/heart-shaped-chocolate-raspberry-cakes.html

2f14c830367086a8da8d1b41987e95ee

Picture from: http://ricette.pourfemme.it/foto/ricette-antipasti-san-valentino_2815.html

Listen

I know my partner has been after Rosetta Stone for a while. Their CDs which you can learn many languages from… however, Im never going to be able to afford that for a valentines day gift. So after some time researching, I came across the Michael Tomas method and just ended up buying my boyfriend the Spanish masterclass!

boxes_range

Image from: http://www.michelthomas.com

Or maybe you could create an old fashioned ‘mixtape’ on a CD of your favourite songs, or maybe they have a favourite artist who have released a new CD or have a concert coming up!

Have no idea who their favourite artists are…. why not just buy them an iTunes voucher and they can choose themselves 🙂

Smell

I received an Imperial Candle for christmas and I LOVE IT! one…. I love candles, and two it has jewellery inside!! OH YES! and its worth £10 to £100. I will do a separate post telling you all about it and showing you the ring I received! You can choose whether to buy a candle with a ring or earnings inside!

fresh_cut_roses-100x130

Picture from: https://www.imperialcandles.co.uk/product/fresh-cut-roses/

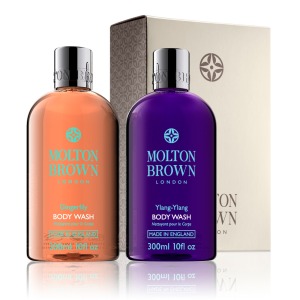
For a more manly touch why not try buying some aftershave? Maybe even a 30ml bottle with a little ribbon round it! I know my boyfriend loves Molton Brown, and they do loads of gift sets!

Molton-Brown-Gingerlily-Ylang-Ylang-Shower-Gel-Gift-Set_WBB182_XL

This is the ‘Entice & Soothe Shower Gel Gift Set’: http://www.moltonbrown.co.uk/store/gifts/gifts-for-her/entice-soothe-shower-gel-gift-set/WBB182/?_requestid=191153 

See

I ended up buying some ‘How to’ books for my partners favourite hobbies!

Are they in to gaming or have a favourite TV show? why not buy them a box set, or even tickets to go to the cinema with VIP seats 😉

You could even buy yourself some lingerie for yourself with your partner in mind… for them to see you in! My favourite lingerie store at the moment is Boux Avenue, they even have free delivery at the moment 🙂

giftwrapping

Picture from: http://www.bouxavenue.com

I hope I’ve been able to give you a few ideas! And of course… the senses give you the freedom and inspiration to think of your own gift ideas!

What have you got your partner for Valentines? Xo

Let Me Help You! Beauty Questions Answered!

Confused.Baby_1

Picture found:http://imunsinkable.com/2012/06/05/who-are-you-calling-mommy/

Hello… How Can I Help 🙂

I can spend hours of the day and night just researching beauty products! I find out what product people like to use most, watch hours of youtube clips on how to use it and read reviews on the pros and cons! Although this is a lengthly process, its something I really enjoy! I love trialling new products and comparing them to others!

This is why I write this blog… So everything I research, I have written down in a safe and organised place! And of course to share and hopefully help someone in their search!

Are you someone who just does not have the time to do all this research and end up buying things you wish you hadn’t? Or just want to know the answer quickly! Well then just leave a comment below about a beauty product that you wish to try, or just a skin issue which you would like some help with and Ill do my best to ensure that I write a review for you and ask the people who are in the know!

For example “I have oily skin, what type of foundation should I use?”

“How can I get softer, stronger hair”

If I can’t get hold of the product myself, Ill make-sure to include the videos of those who have, the pros and cons of the product, alternative ones which you may prefer and much more 🙂

Don’t get me wrong Im no dermatologist, just a girl that loves to spend hours researching anything beauty! ill do my best and do the hard work so you dont have to! Ill point you in the right direction! 🙂

So just leave a comment below and ill find out for you!

Xo

Help Your Make-up Brushes Last Longer!

IMG_2260

The key to the perfect makeup isn’t just in the application, but in the actual make-up brushes too. Brushes are often a necessary part of your beauty routine, and when cared for can become a compliment to any user. Heres some of my favourite tips that I’ve researched and tested through out the years.

Wash Your Brushes Regularly

Cleaning your make-up brushes is one of the most important things you can do. Dirty brushes are full of bacteria which you’re simply wiping across your face, for me this is a recipe for breakouts!

I use Clinique’s Makeup Brush Cleanser which is really cheap and easy to use. I have a post dedicated to it if you would like to read more. If you don’t have the chance to buy a cleaner, you could just use a mild soap for a synthetic brush, or baby shampoo for a real hair brush and run them under warm water and swirl into your make-up brush in the palm of your hand to remove any build-up. Repeat until your brush and water run clear.

After washing them, gently pat with a paper towel to ensure they are almost dry. Lay them flat where the bristles can hang off the end of a box or table. This ensures that they keep their shape. Keep away from too much heat/sunlight and dust. Ensure they are not covered so they are allowed to full dry.

Store Them Properly

I like to store my brushes vertically and ensure they are separated by purpose (eyes, lips, face). This helps allow them to keep their shape when not in use and are able to breathe.

Use the Right Brush with the Right Product

Natural hair brushes should be used with dry formulas such as powders, bronzers and blush.

Synthetic brushes should be used with liquids and creams.

This is because they absorb the products differently.

Invest

This is the old saying of ‘You get what you pay for.’ Ive found that the more I’ve invested in a brush, the longer they last. Also the more I spend, its as if they apply my make-up better, they have appropriate shapes which hold nicely and even have a nicer feel to them when brushing on the skin. They might seem pricey but you’ll save in the long run. Trust me its worth it!

Don’t Forget Your Other Beauty Tools

Its so easy to forget your tools such as tweezers, lash combs and curlers, but these need to be washed to. I like to spray these with an alcohol-based brush cleanser, like my Clinique or Mac.

I hope this will come in handy! I know how many gorgeous brushes I ruined after cleaning them… by standing them up straight away, the water ran down, warping the barrel and ruining the glue to the bristles ran out! Simple things can really save you time and money!

Whats your favourite tip to help your make-up brushes last longer? Id love to hear 🙂

Much Love Xo

Winter Foundation Tips <3

Good morning to all you beauty addicts out there! 🙂

Its winter… Ive upped my cleanse, tone and moisturising routine, even adding a splash of retinol to my night time routine. I now go to bed and wake up with soft dewy skin. BUT THEN… I put on my make-up. I end up with flaky skin, a powdery finish and the occasional pool of oil. (Wait where did that pool of oil come from.. and why does the palest foundation make my skin look orange?) Well through my research, trials and tribulations I’ve found some amazing tips that I just had to share with you!

Technique 1:

Apply your foundation with a damp beauty blender. I have tried many before, and any brand, no matter the price seem to give the same results. I will do another post on how to clean and maintain your beauty blender very soon, as there are a few things you need to be careful with.

IMG_2254

For those of us with dry skin, its essential to not use those harsh bristled brushes when applying our foundation, especially in circular motions as it causes microdermabrasion and thats how you get your flaky skin! The beauty blender allows you to softly place your foundation and easily manipulate coverage over your skin.

I dampen my beauty blender with Macs Prep + Prime Fix +. Its a lightweight spray which helps ‘create an even surface for a smooth makeup application.’ Plus it saves me having to go to the sink every time I do my make-up.

IMG_2252

When I’ve finished my foundation I then apply a translucent powder only to the areas of my face which cause me the most trouble and shine. E.g. my nose and across to my cheek bones, the centre of my fore head and the centre of my chin. Too much powder will increase your chances of flaky skin and give you an un-natural finish.

Again, although I do apply my powder with a real-techniques brush, I do not buff the powder into my skin. I use the brush like a powder puff and use the same technique to apply the powder to my skin as I do my foundation with the beauty blender. As again, I do not want to exfoliate my skin, especially after all the effort that went into placing my foundation.

I follow this step sometimes with my Mac Prep + Prime Fix +. Simply spraying it lightly across my face to help set my make-up. Although you have to make sure you spray from the right distance, as too much will disrupt your makeup. I really like the effect of this spray, it helps to make my skin feel fresh and removes any chances of a powdery finish that I may have caused. It helps your skin look more natural and healthy, but not adding any oil and shine.

Technique 2:

If your as much of a beauty addict as I am then you’ll have heard of ‘gossmakeupartist’. A youtube channel run by make-up artist Wayne who has over 15 years experience. Ive learned so much from him and love watching his channel. Recently he has posted ‘The most amazing foundation tip you’ll ever learn’ with a follow up of ‘change the way you set your make-up forever.’

These tips are great for people with dry skin, as he talks about adding oil to your foundation to help give you a natural, moisturised finish. He then talks about how to soak up any excess oil which is what Im going to discuss with you today.

I tried this trick just with my normal foundation, in those pools of oil I was telling you about that would just appear on my skin, as if from nowhere! I also think that this would be a great tip for the summer, when my foundation appears to run down my face!

First you’ll need a clean sponge. I used the other side of my beauty blender that I had used that morning. You then take a tissue and pull the two layers apart and wrap 1 layer around your beauty blender as so:

IMG_2255

You then gently pat the oily patches of your face to soak up any excess oil. If your using Waynes foundation tip to combine oil with your usual routine, then you would pat the sponge all over the skin. He advices using one of the layers for one side of the face, then using the other layer for the other side.

IMG_2259

This is what the finished results look like of the beauty blender. The tissue has absorbed the excess oil and left your sponge clean underneath. I then didn’t need to apply any powder after this which I loved. It helped to keep my skin looking more natural and healthy. Wayne even claims that this will stop your foundation changing colour because you don’t have all the excess oils from the foundation mixing with your own natural oils! BONUS!

You can check out ‘Gossmakeupartist’ here:

https://www.youtube.com/channel/UCCvoAe__WFYMNAEN-C-CtYA?spfreload=10 

And check out his video here:

https://www.youtube.com/watch?v=5dqo5ljsals&spfreload=10

I hope my research will help you guys as it has me! If you have any more tips to share about applying foundation with dry skin, or if you’ve tried the same tips as me then i’d love to hear from you!

Much Love Xo

Fake Lashes In A Bottle!

Fibre Lash High Res Image and Pack Shot

I am a big beauty lover and I can sit and watch people on youtube reviews products and applying make-up for hours! I had heard so much about younique 3D fiberlashes mascara an american company which sold them at $29.

Stumbling through boots, trying to find some individual false lashes, but struggling to decide which ones… Im one for the natural look with just a bit of oomph, so for me the sets which provide 3 different lengths are a waist of money… the short ones are too short but the long ones just too long…

THEN I FOUND IT. The model Co Fibre Lash Mascara. Just like the other products id seen raved about online, it contained one ‘Extension Mascara’ and one bottle of ‘Fibre lashes’. I believe this product is a MUST for the christmas party season!

How to use:

  • Onto clean lashes apply one layer of the extension mascara
  • Brush on the nylon lash fibres. TIP: look down when applying to help prevent the fibres falling into your eyes.
  • Wait 30 seconds and apply another coat of the extension mascara to secure fibres in place
  • The more layers you apply the more dramatic result

They are suggested to create ‘voluptuous, clump free lashes which are smudge and tear proof, yet easy to remove.’

My experience of one layer:

IMG_2123My lashes without any product

IMG_2124My lashes with one layer of extension mascara

IMG_2126My lashes after the application of the nylon fibres

IMG_2127After the final application of extension mascara
A clear before and after:

IMG_2123IMG_2127

I really do notice the difference when I use this product! I love it! At first the application of the white nylon fibres was pretty scary as Im so uneasy about putting anything near my eyes. However, I found the fibres to be lightweight and I didn’t even have any fall out; they adhered to my own lashes easily acting like instant individual false lashes. The results produced longer and thicker lashes in seconds. The removal was actually really simple, and I used my normal eye make-up remover ‘Nivea Daily Essentials Double Effect’.

At £35 it did seem like an expensive risk but I honestly do think its worth it. Especially for those who find false eye lashes too heavy/ difficult to wear or want a little bit more glamour without going over board.

This mascara was also voted:

‘2011 Harpers Bazaar UK Hot 100 List – Top Lash Secret’

‘2010 Australian Beauty Awards – Most innovative New Product In Makeup’

A little out of date I know, but they still have me convinced 🙂

Heres your cheaper alternative:

lash-architect-4d-mascara-black

L’Oreal Paris has created the ‘False Lash Effect in 4D Lash Architect’ Which has been enriched with 4mm fibres to build and attach on to your natural lashes for ‘re-shaping and sculpting’

IMG_2120IMG_2146

Again another noticeable difference after just one application. This brush however is quite clumpy, as though the fibres are all mangled together, but even when I look closely I can’t see any :/ But for only £10.99 it is an excellent cheaper alternative. Again I didn’t experience any fallout of the tiny fibres and thought the product was lovely and lightweight.

Have you tried out any fibre lash mascaras? Id love to hear what you think!

Much love Xo

L’Oreal Paris Volume Million Mascara

IMG_2118

I find mascara one of the hardest things to buy. I think that they hardly ever live up to their claims and theres just so many to choose from… so many different types of brushes.. but I swear they do the same thing. So Im here to help break it down starting of with L’Oreal Million Lashes Mascara.

This L’Oreal mascara claims to cause no overload or clumps with an ultraflexible applicator with both long and short bristles to coat each lash evenly from root to tip.

IMG_2119

And here it is… I agree that the way the tube has been created its great to see removal of excess product and no clumping. However, I find that regularly the tip of the mascara did have a build up of product which I did end up dabbing on my eyelid a few times. I also found that due to shape, it was quite difficult to get into the corners. I also found the brush quite scratchy!

IMG_2120IMG_2121

Here are the before and after results, not the best picture but it does clearly show a difference. I was really happy with results as it did make my lashes look a lot longer and at £10.99 from such stores as boots I think it is a good buy.

Would I buy this product again? I don’t think so, despite really good results, the scratching as it was applied to my lashes makes me feel a bit uneasy!

Have any of you tried this product? I would love to hear what you thought of it. Please leave comments below.

Much love Xo

L’Oreal Color Riche Lip Intense

IMG_2132

I am currently loving the new trend of berry lips! Especially for christmas! Im also trying to find the right ‘nude’ lip for my hair and skin tone…. I seem to be struggling :/

Recently I bought 4 Color Riche Lip Intense by Loreal. Available in over 30 shades from natural nudes and soft pinks to bright daring corals and reds. These are part of the ‘Made for me’ make-up range, so I thought it would be easier to find the right shade, as they let you know which colours are for lighter skin, brunettes/blondes etc. Its suggested to have a rich formula with a combination of Omega-3 and vitamin E to leave your lips feeling moisturised

Things I look for in a lipstick:

  • Moisture (especially in winter)
  • Long lasting colour
  • Non-sticky forumla

IMG_2135IMG_2134

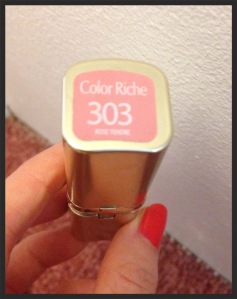
This is shade ‘303 Tender Rose’

I wasn’t too keen on this shade as it made my dry lips more noticeable. I also thought that the shade made me look as though I had been playing in a childs make-up box. This shade is suggested to suit light skin tones and blondes.

IMG_2139IMG_2140

This is shade ‘102 – Beige Praline’

I really do like this shade and feel it is a great nude tone for my light skin tone and brunette hair.

IMG_2136IMG_2137

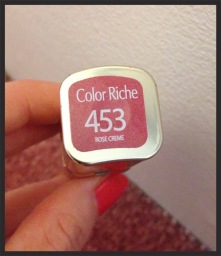
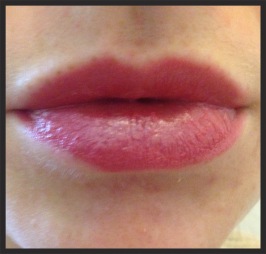
This is shade ‘453 in Rose Creme’

This is suggested to a natural shade suited to light brunettes. I really did like the subtle pink.

IMG_2138IMG_2141

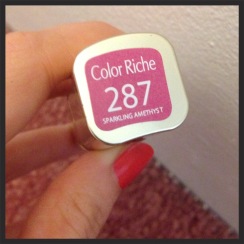
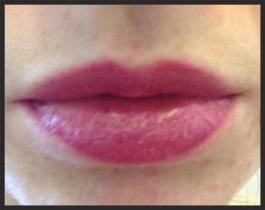
This is shade ‘287 in Sparkling Amethyst’

This is one of their ‘intense’ shades aimed for brunettes.

As much as I do love this colour, I think it is quite similar to that of ‘453’ as seen above. For one to be called ‘natural’ and the other to be called ‘intense’ is quite a puzzle… couldn’t I just apply a thicker layer of the ‘453’?

I was quite disappointed in this shade as the lipstick itself is a rich plum colour and quite shimmery. However, when applied to my lips, the added shimmer disappears and its actually quite a bright pink shade.

Although the shades weren’t what I was expecting, I do like the colours and love the way the products make my lips feel. At £6.99 from stores such as boots I think they are a great buy and I would even suggest that they could be used as an alternative to lip balm, they really gave long lasting moisture to my lips. I also think that the colour lasts a good few hours (I went shopping and even for a coffee).

Have you been able to find your perfect shade? Let me know what you think of these products by leaving your comments below. I would love to hear from you.

Much love Xo.

Retinol Reface: My Mini Skin Miracle

IMG_2142

Its winter… My skin is dry, red and itchy. My cheeks feel like I have crocodile scales forming and my nose feels bumpy

If you’re like me then I’m sure your sick of clogged pores and the damage that the weather conditions can have on your skin. Well you may just want to listen in… I think Ive found it… something so simple.

I happened to stumble upon a few websites that suggested the ‘perfect skin care routine’ They of course suggest hydration through drinking lots of water and a good moisturiser, cleansing and toning the skin with a good exfoliation routine. The ordinary routine that everyones heard of. Which yes… I do.. and don’t get me wrong I love my Clarins products and without them my skin is crazy!

But wait… what was this… the last slide suggested a good retinol cream to use before you go to bed? Well this was something I hadn’t heard of before… so I started to research… heres what I found.

According to the CEO of Bluemercury

  • Retinol is one of the most powerful anti-agin ingredients to help re-texturize the skin
  • it is derived from vitamin A and can appear in different skin care products at various strengths and forms

So how do you use it:

  • You can have retin-A prescribed to you by your local dermatologist or GP. These products are sure to provide better results than the over-the-counter products.
  • Over the counter products contain retinol, which is gradually converted into retinoic acid (the active ingredient in the prescription creams). So they are less potent and will take longer to work. Can take up to 12 weeks to see a noticeable difference.
  • Wash your face as normal and allow 20 minutes before applying the retinol cream
  • a pea sized amount all over the skin, avoiding the eye area
  • make sure to introduce the product slowly to your routine. For example, once every 3 days for 1-2 weeks then once every other night then eventually every night. This will help to avoid any side effects.
  • Be careful what product you mix it with – I would do your research before combining it with your normal moisturiser. (The retinol cream i bought has a built in moisturiser so I use it on its own)
  • Avoid exfoliants for a while whilst introducing it to your routine. The retinol acts as an exfoliant so you don’t want to over do it.
  • Be sure to use a sunscreen during the day. Retinol is sensitive to sunlight, so thats why we only use the product on our skin at night.

Side effects: Unfortunately, for most, side effects are very common as your skin will need to adjust to the product. But you have to battle through, they are whats known as ‘purging of the skin’ and don’t worry they will reduce as you continue to use the product.

  • Irritation, redness and dry skin.
  • Initial breakouts and purging.
  • Sun sensitivity

My experience:

  • I have now been using my product for 4 weeks.
  • Yes I was one of lucky ones – My skin purged – for me this was just a tiny pimple each time I used it. But they were easy to cover and all I thought to myself was “one pimple now, amazing skin later”
  • My skin, after the first few uses, was also quite dry and flaky in patches such as my nose. This was the exfoliation affect and removal of old skin cells.
  • I found that I put on the product to close to my eyes, so the thin layer of skin had become a little sensitive and dry.
  • After 4 weeks: When I use the product, I don’t have any dry or flaky patches. I have stopped my usual exfoliation routine, yet I find that my skin is soft and the bumps on my nose have reduced.

Which product do I use? Indeed laboratories ‘Retinol Reface’

  • Fragrance free
  • ‘Non-Irritant’
  • contains retinol and hydroxypinacolone retinoate
  • has a nice silk like texture and a lot goes a long way
  • Usual price: £19.99
  • not tested on animals

My view: I wasn’t expecting miracles and I was prepared after the research I had done to expect my skin to purge. I am really happy with my results and can’t wait to the further results I have in a few weeks time. My skin looks softer and healthier with a very welcomed subtle glow. I managed to buy mine at 50% off from boots so at only £10 I am really happy with the product I have. I wouldn’t use this as my sole moisturiser as I prefer creams which are strong emollients. I would honestly recommend this product.

Heres some websites which I gathered my information from:

I would love to hear if any of you have tried a retinol product before and what you thought of it! Do you have any other skin tips you would like to share? Please leave comments below 🙂

Much love Xo